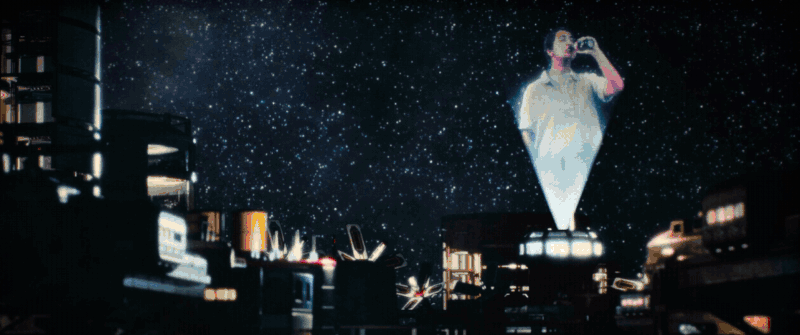
Final Animation
Concept Pitch
The Brand
Before I started thinking of concepts, it was important for me to understand Coca-Cola branding as a whole. I had to keep in mind that the brand focuses on happiness and togetherness, using slogans and ads that connect with people worldwide. They value new creative approaches and thinking outside the box.


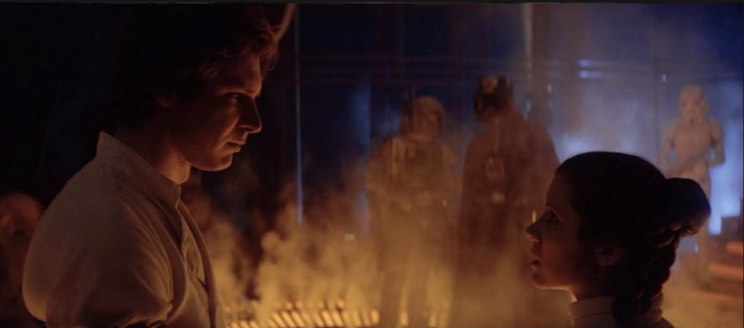
Reference from Andor Star Wars: Rogue One
Atmosphere
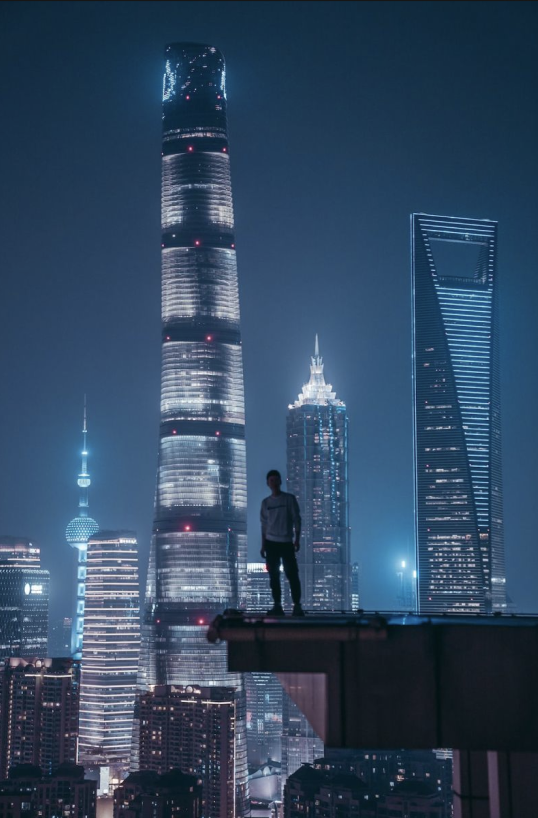
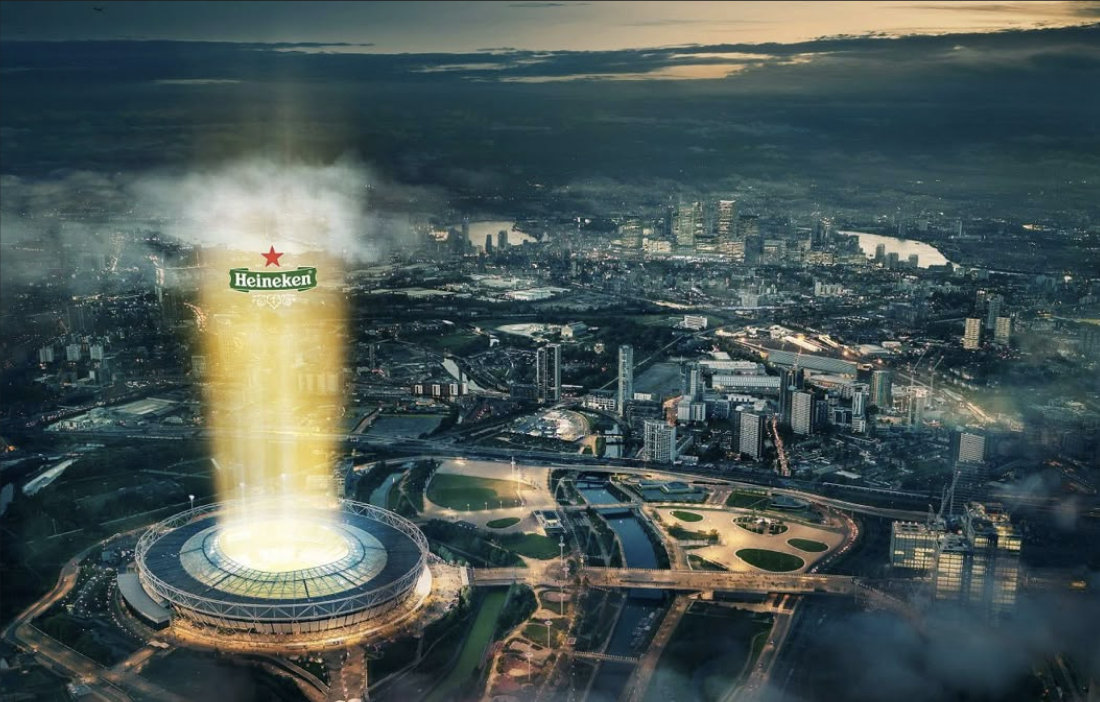
I took in consideration that will be using a hologram as my main focus, so I needed to design the atmosphere to be at night, while still fully alluminated. I took reference from these images where the foreground elements are shadowed to bring focus on the most illuminated figure in the background. Another thing I noted from GC, was that my hologram should be stick out like the buildings in the reference so it stands out among the scenery.
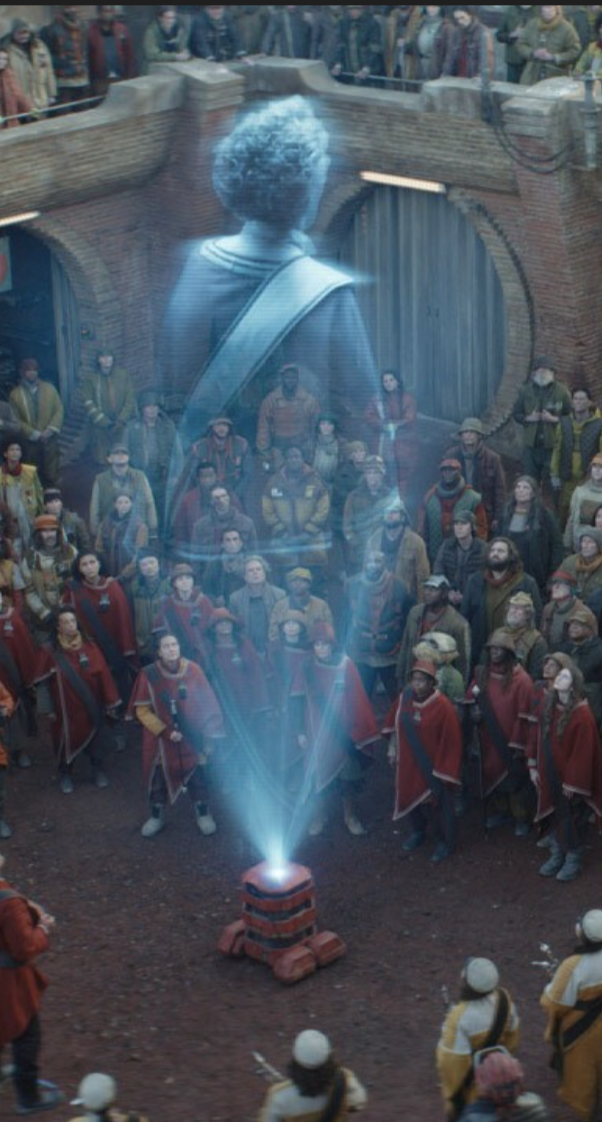
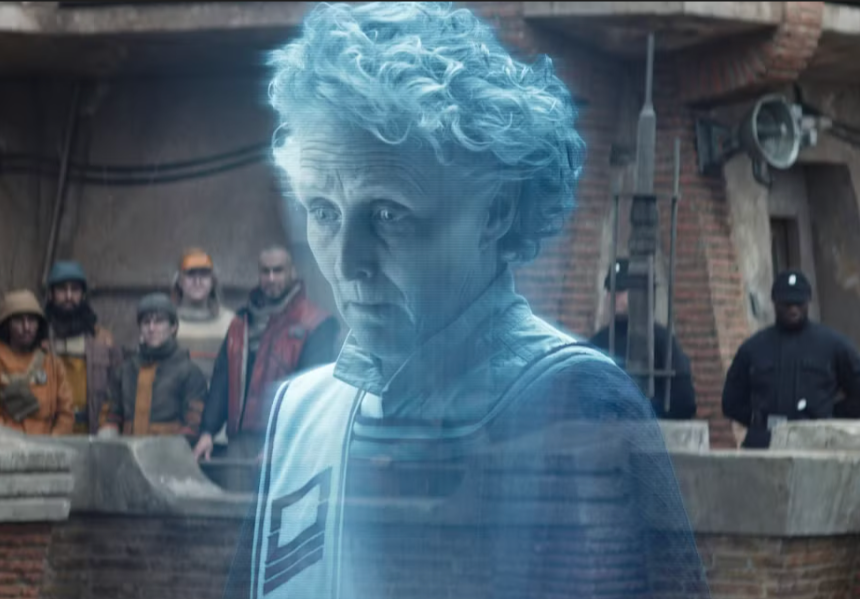
Reference from Maarva’s Hologram in Rogue One
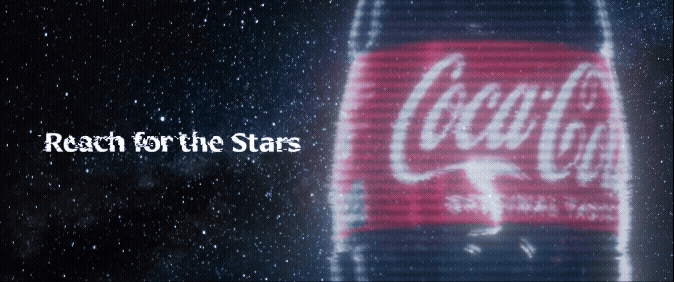
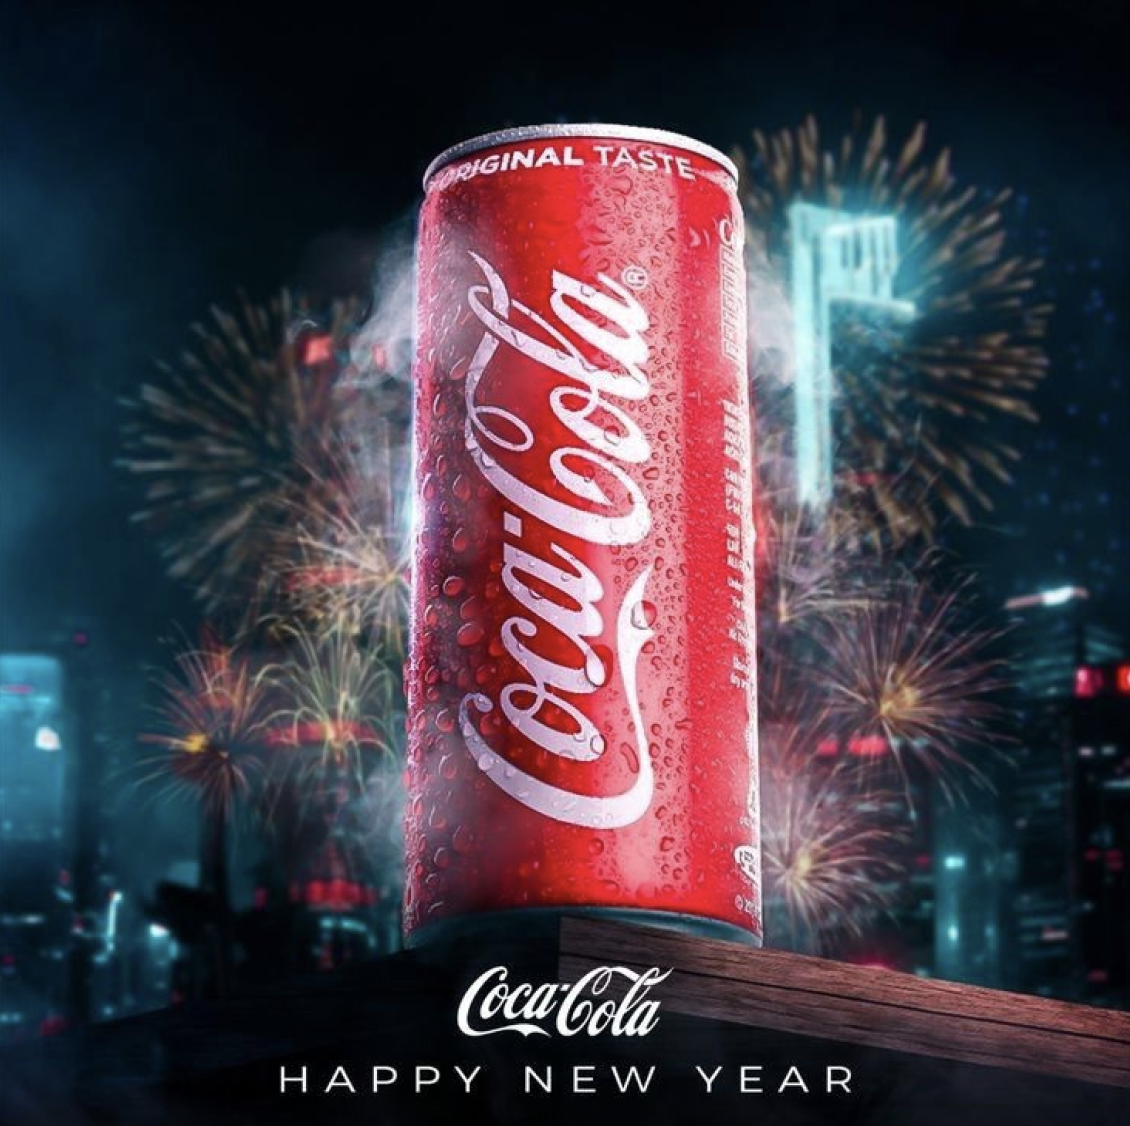
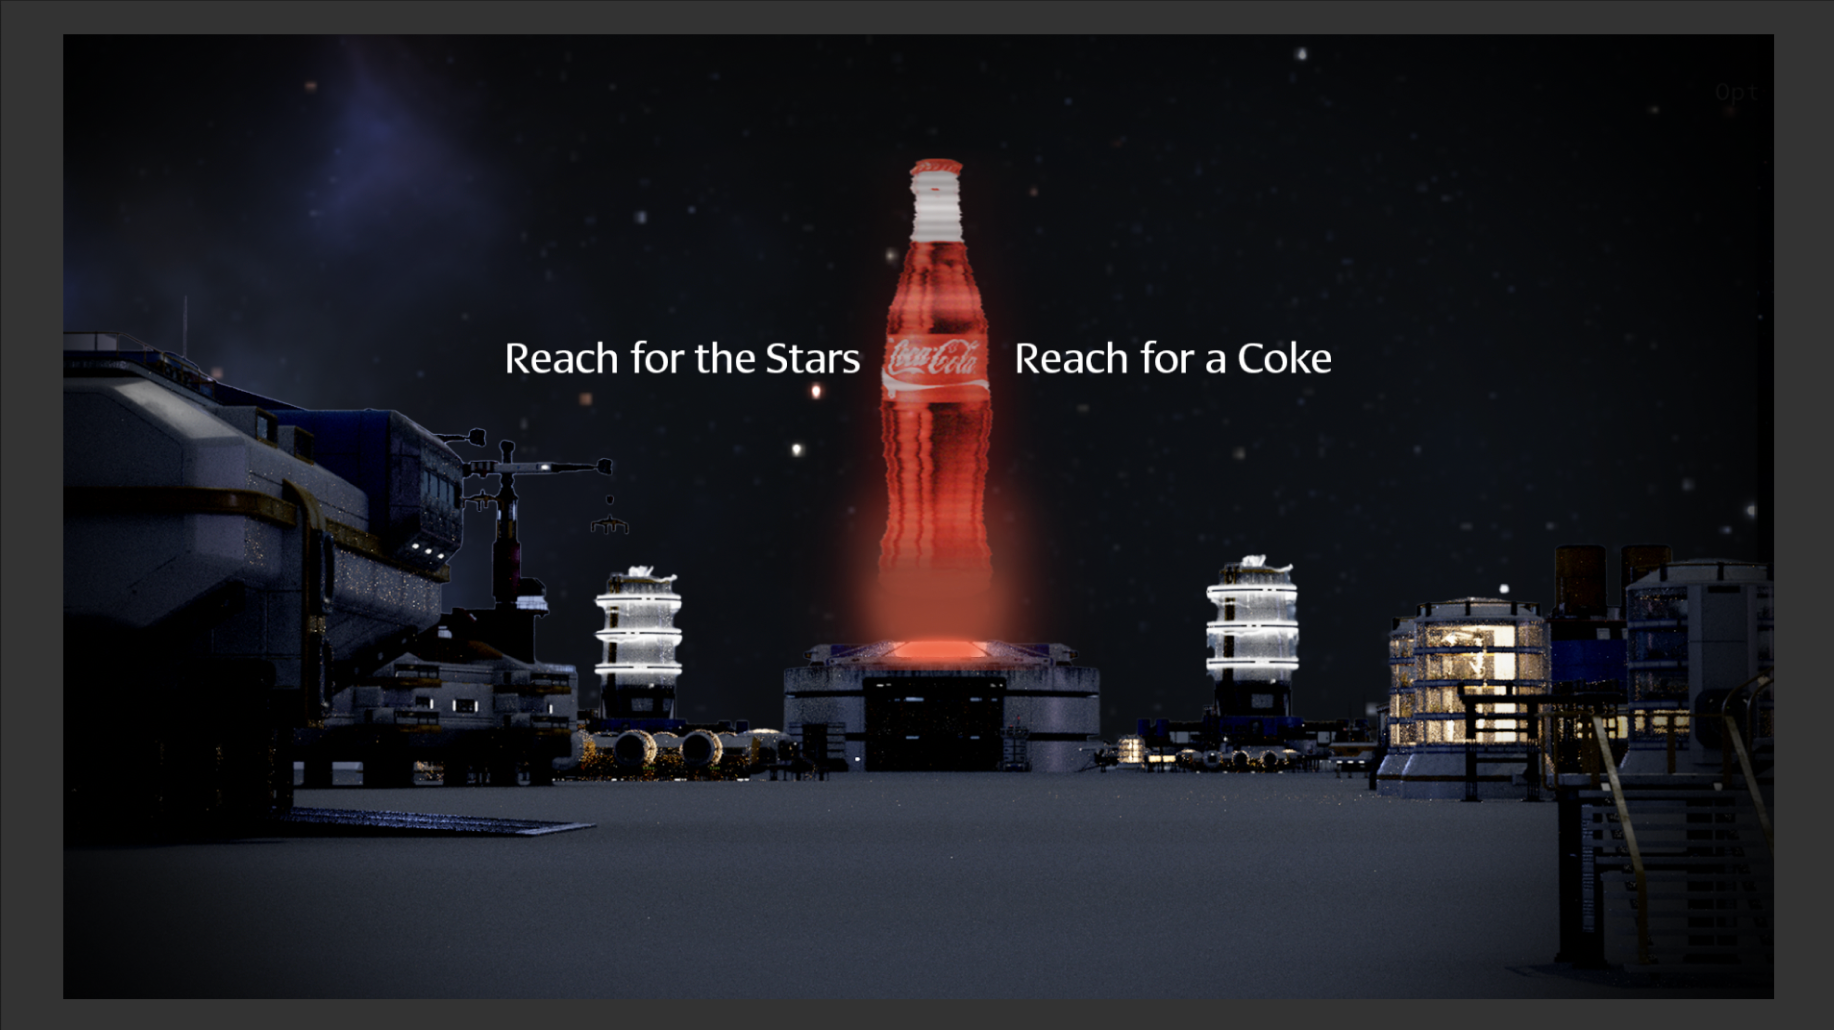
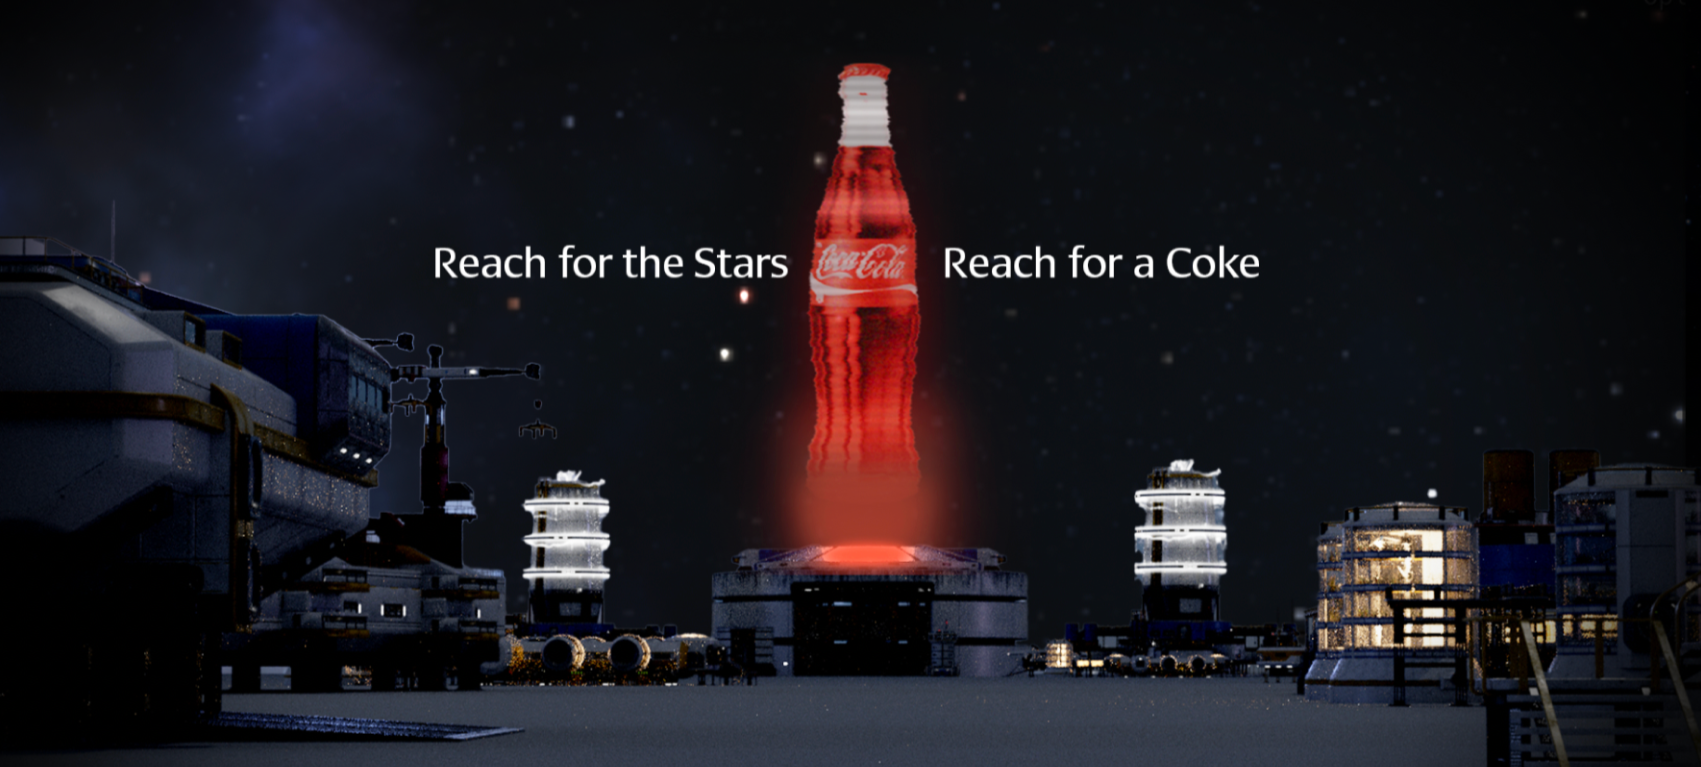
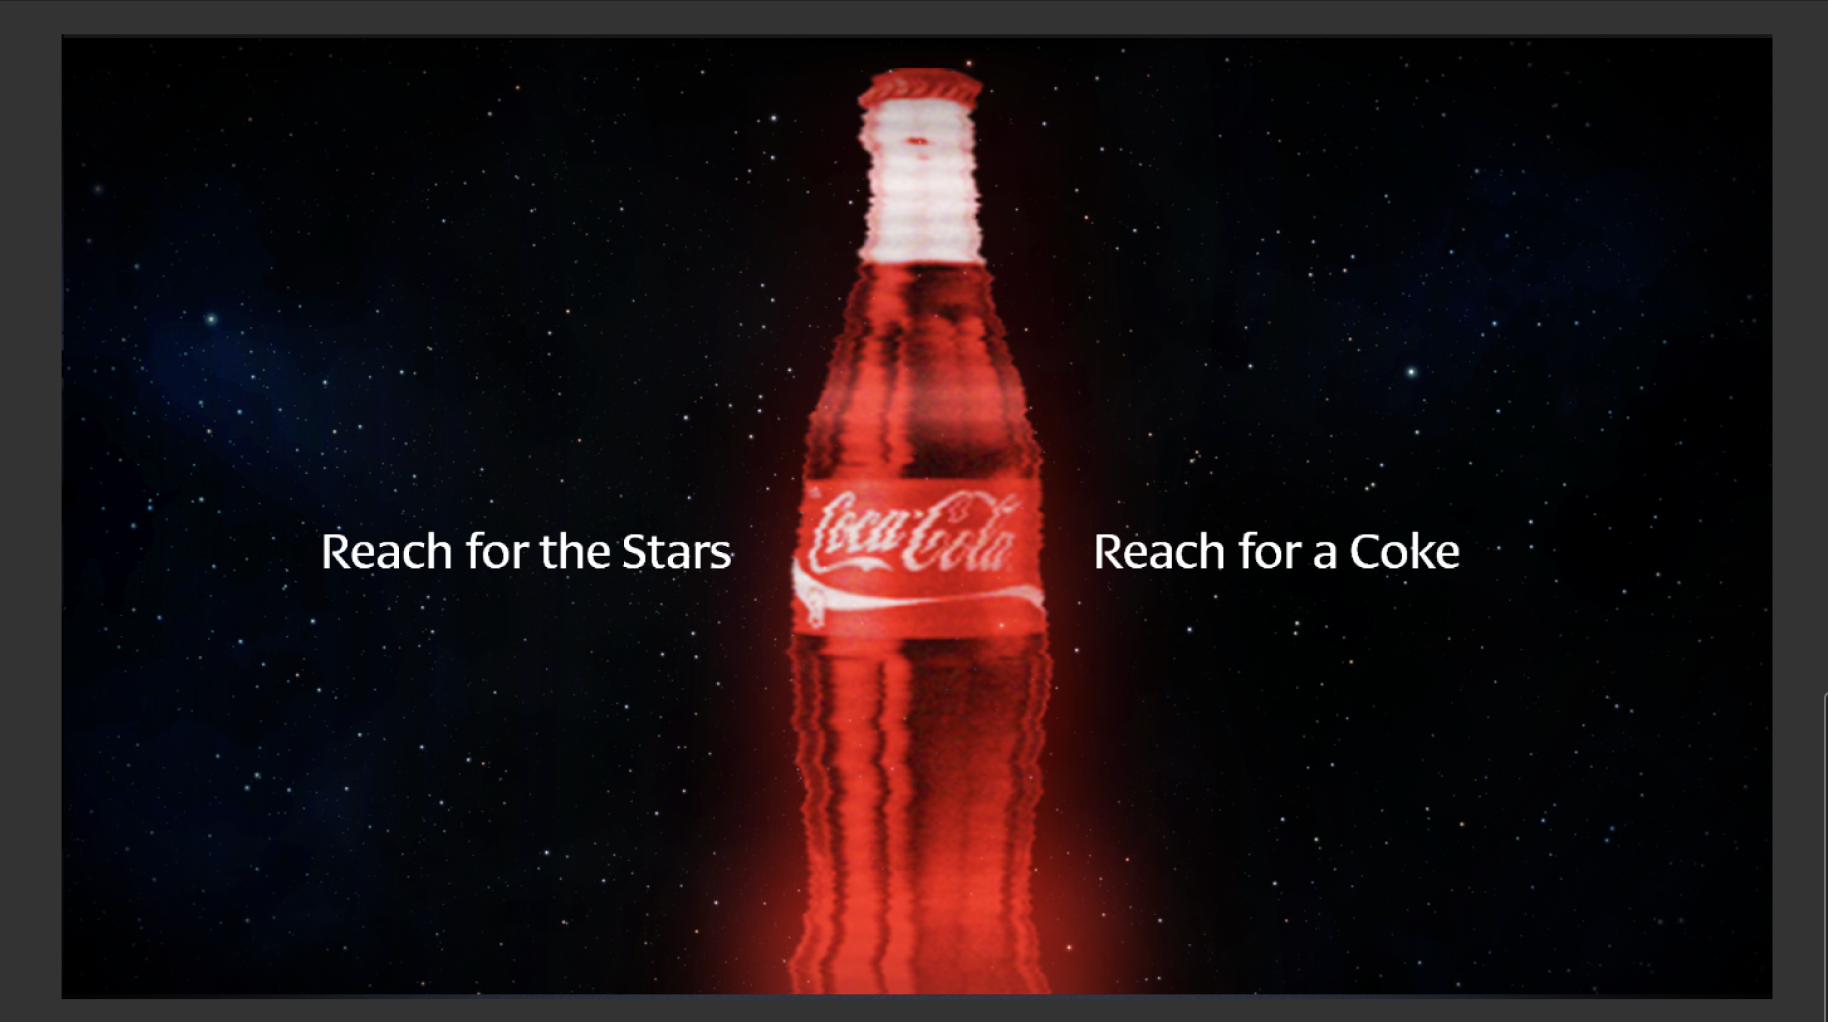
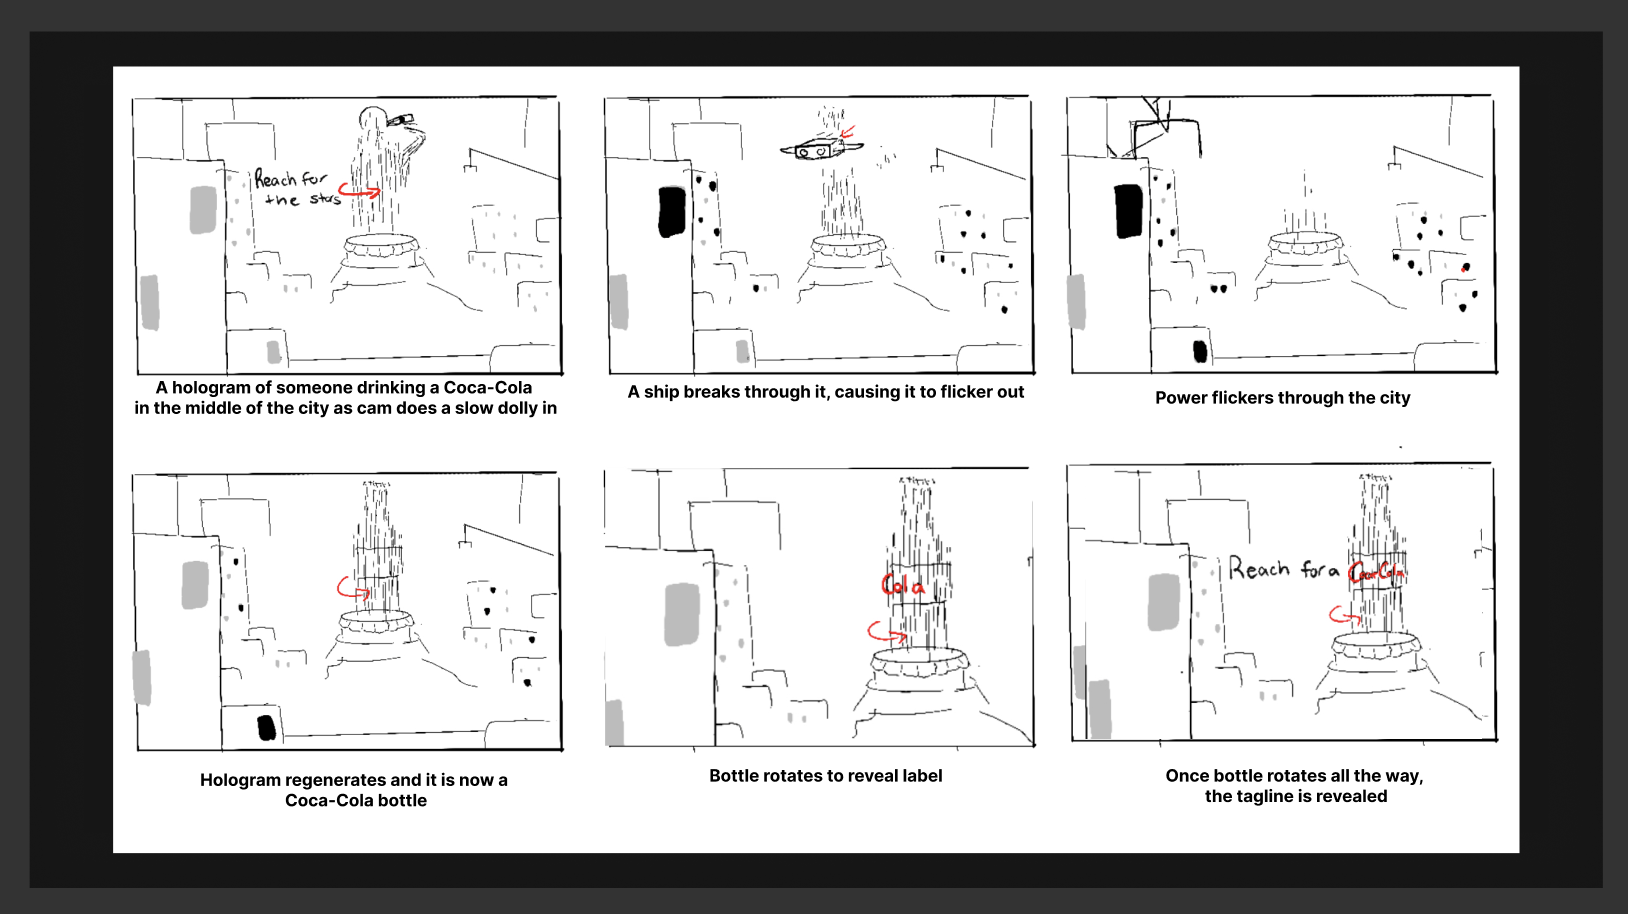
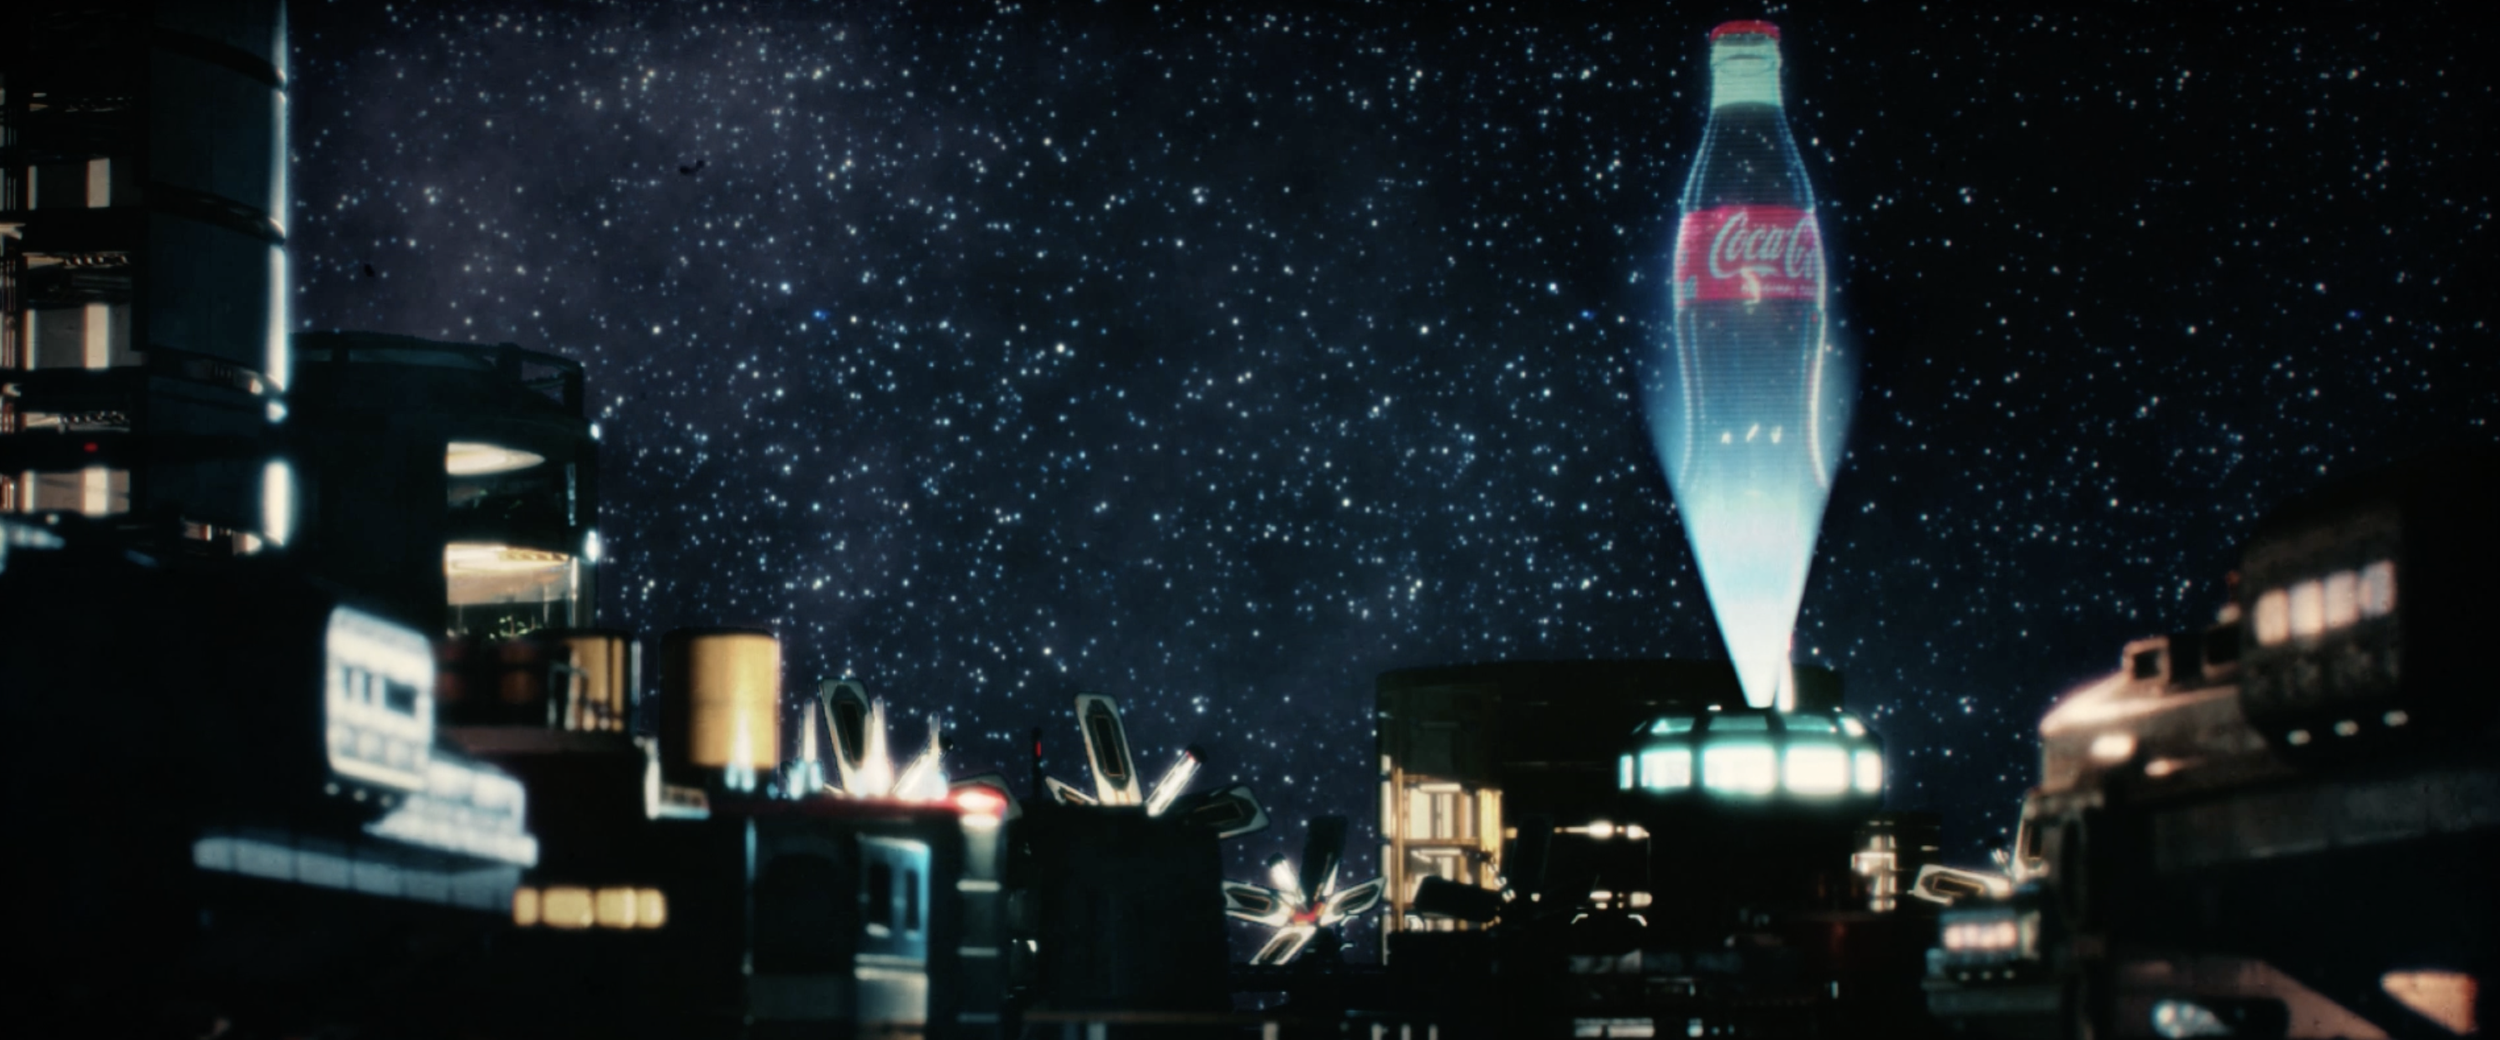
The concept of the animation is a hologram of someone drinking Coca-Cola, projected in the middle of a futuristic city. The hologram then glitches and shifts to reveal a full Coca-Cola bottle, slowly bringing the label and logo into focus. The scene then cuts to the lockup “Reach for the Stars, Reach for a Coke,” animating on screen alongside a close-up of the hologram’s Coca-Cola label. Setting the piece in a space-themed environment reinforces the slogan, while beginning with someone enjoying the drink before transitioning to the final product highlights how the brand values consumer enjoyment as a central part of its identity.

Composition
Once I developed my idea for a concept, I did more research into compositions I wanted to reference that would best support the hero of my story. I felt inclined to go with interesting framing where the surrounding buildings frame the hero element and direct the eye to the central focus, the Coca-Cola bottle. For my final scene, I reference this shot from Andor in Star Wars.

After reviewing the style frames, I was advised to add more buildings to better fill the scene and to apply an overall tint for a more cohesive look. I was also told to give the hologram a stronger blue tint to make it feel more like a true hologram.
Behind the Scenes
The storyboard above reflects the idea I initially pitched, but the final deliverable was adjusted, with a few non-essential elements removed.
First Pass Style Frames
Hologram
For my hologram, I once again looked to Star Wars as a reference and analyzed why their hologram visuals are so effective. I noticed that the key elements were color, transparency, and the level of detail that still comes through. In my own work, I ran multiple experiments with different amounts of glow, contrast, saturation, and transparency. I found that preserving most of the original color while adding only a subtle glow helped the hologram’s details stand out more clearly. By adjusting the glow and contrast in Nuke, I had greater control over how well the hologram integrated with the overall scene.
Takeaway
The research I did before this project was very helpful in allowing me to understand the mood of the scene to be and how to still implement Coca-Cola’s branding.
Reach for
the Stars
Software Used:
Houdini
Karma
Nuke
After Effects
Design Challenge
I created a 5–15 second animation for Coca-Cola’s new campaign, “Reach for the Stars, Reach for a Coke.” The project required incorporating KitBash3D assets, as Coca-Cola partnered with them for this initiative, integrating their models into the visual concept.
Credits:
Animation and Composite:
Hailey McMahon
Building Models:
KitBash 3D
Coca Cola Bottle Model:
cgtrader
Layout
The lighting in the scene was driven by a distant light source, creating strong visual contrast between the foreground elements and the hologram in the middle ground. The light was tinted blue to mimic the illumination emitted by the hologram, producing a subtle rim light that helps define the silhouettes and architectural details of the surrounding buildings.
Pitch Styleframe 01
Pitch Styleframe Lock Up 02
Research

Storyboard
After reviewing the style frames, I was advised to add more buildings to better fill the scene and to apply an overall tint for a more cohesive look. I was also told to give the hologram a stronger blue tint to make it feel more like a true hologram.
Layout and Lighting
My first pass at the style frame used a nighttime setting, illuminated only by the building lights and an HDRI. Because there was no defined light source other than the HDRI, the city felt flat, and the hologram lacked any believable light interaction It didn’t feel integrated into the scene, so to solve this, I removed the HDRI entirely and introduced distant lights positioned behind the buildings to create a rim light. This provided a clear directional light source and allowed the hologram to cast and receive light more naturally within the environment.
Siona Kalambi
Lighting
Using the reference I found from Star Wars: Rogue One, I positioned my hologram on the right third of the frame, while placing buildings in the left foreground and creating a diagonal path leading toward the left third. This established a more dynamic composition and introduced visual movement that guides the viewer’s eye across the screen toward the main focal point.
Final Pass Style Frame
Nuke Node Tree
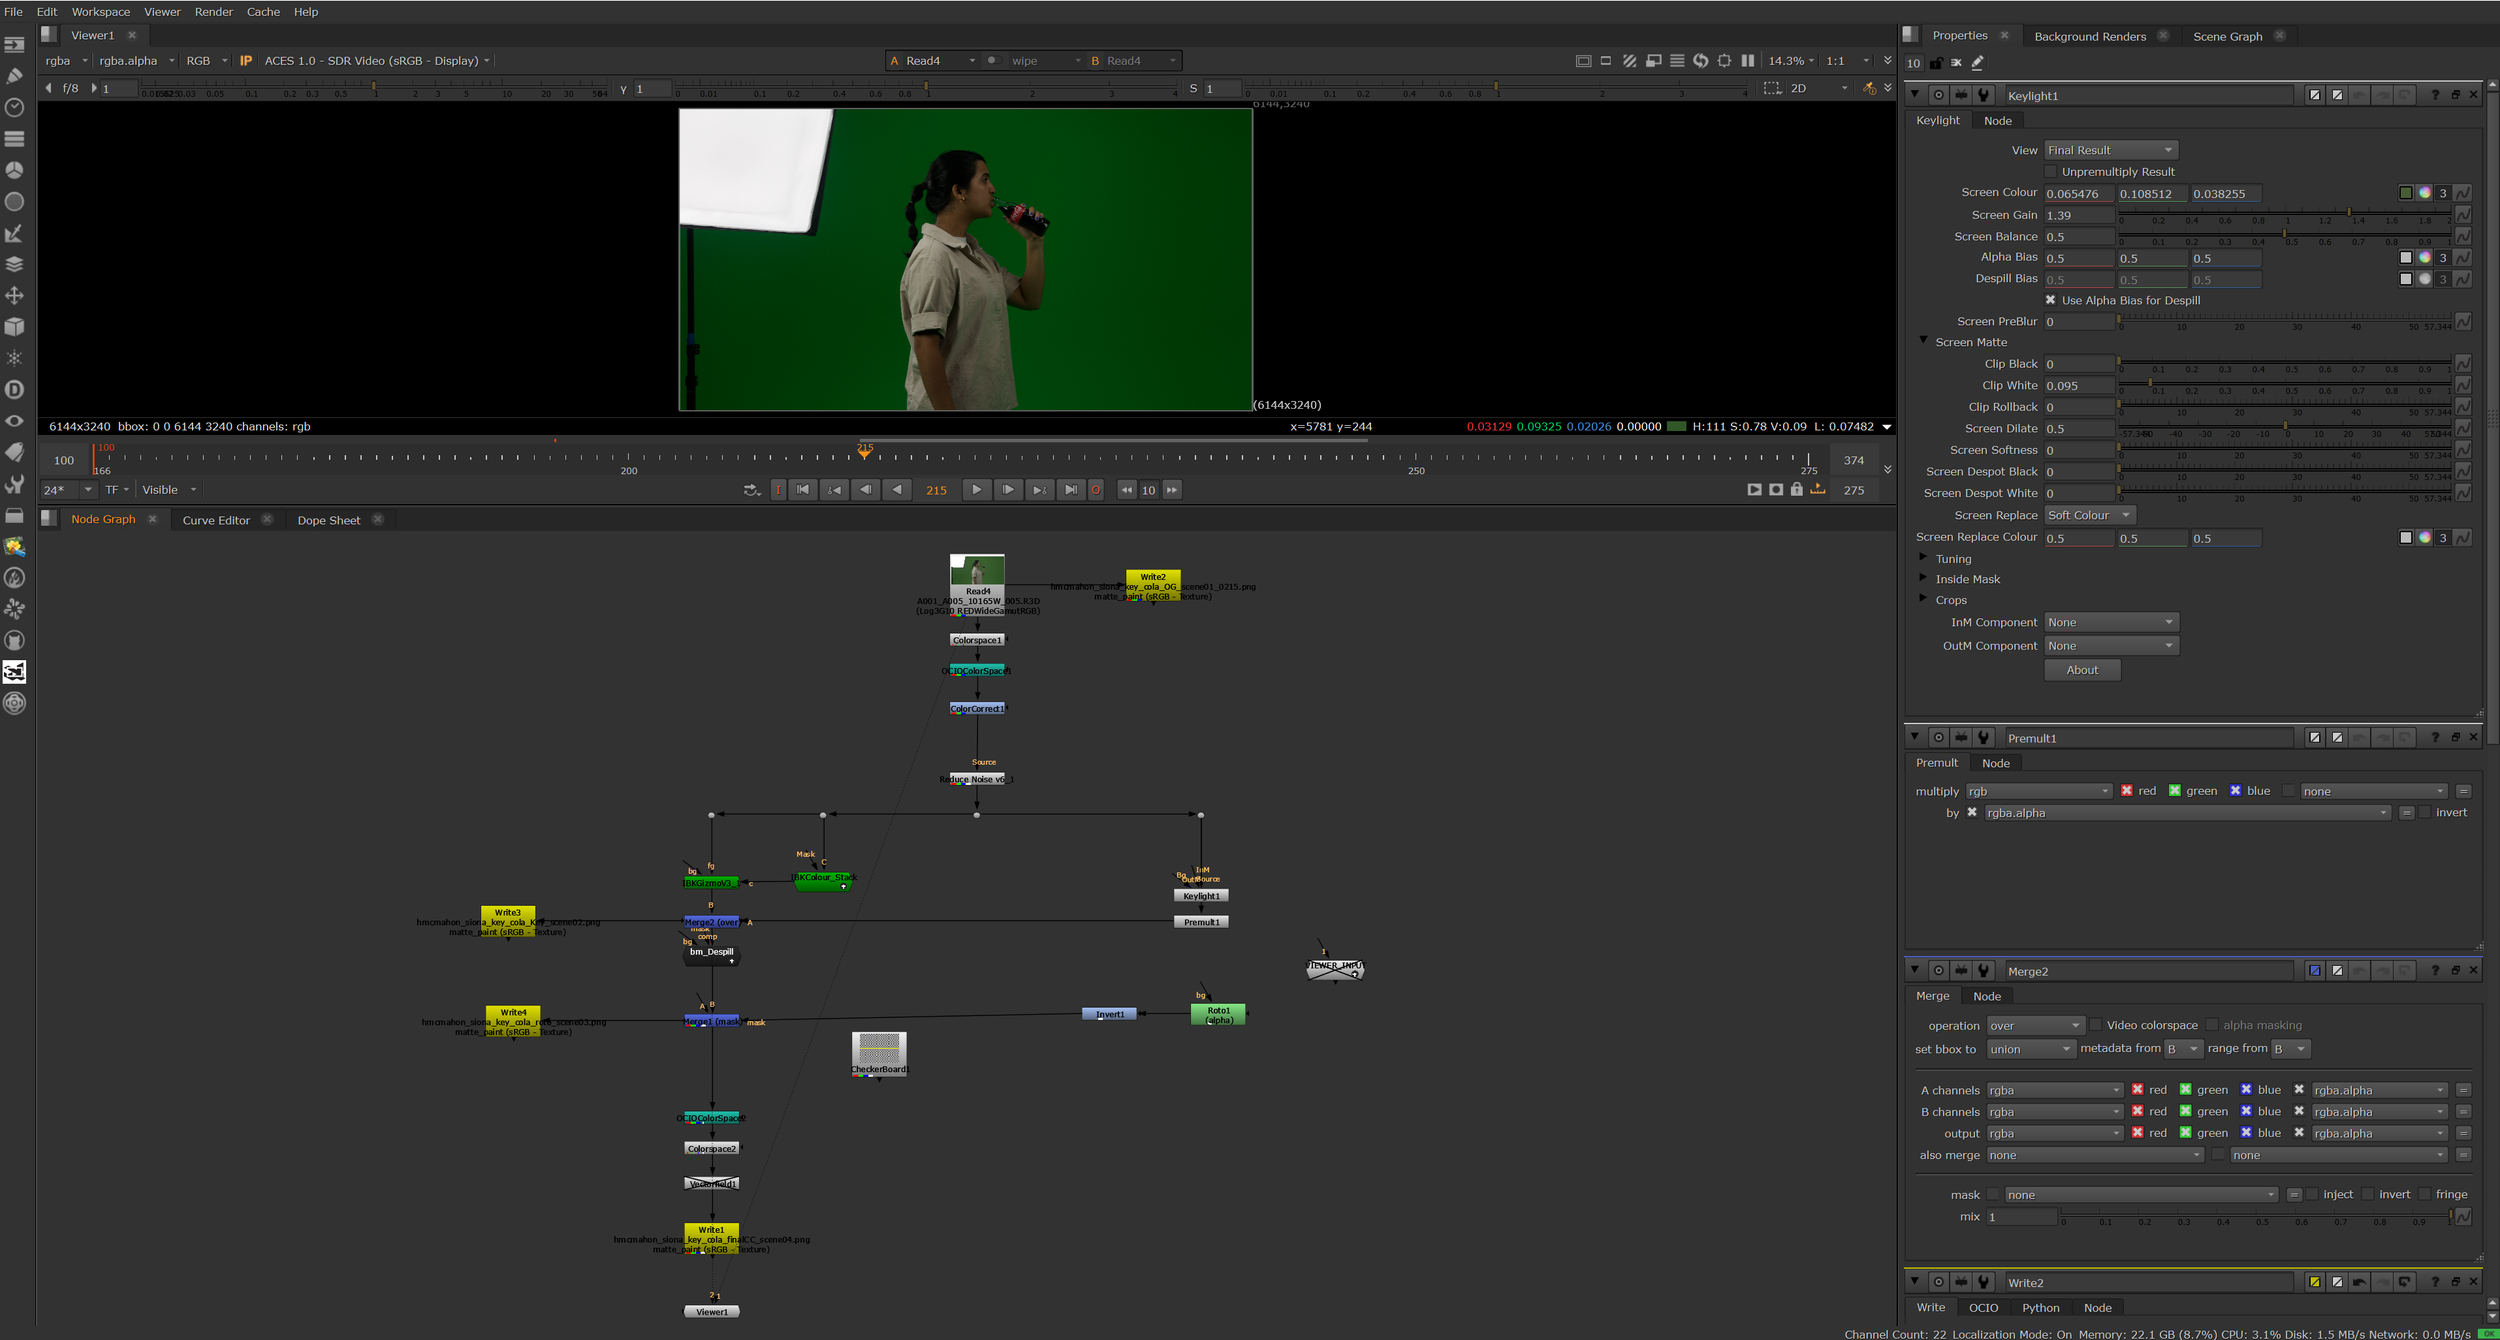
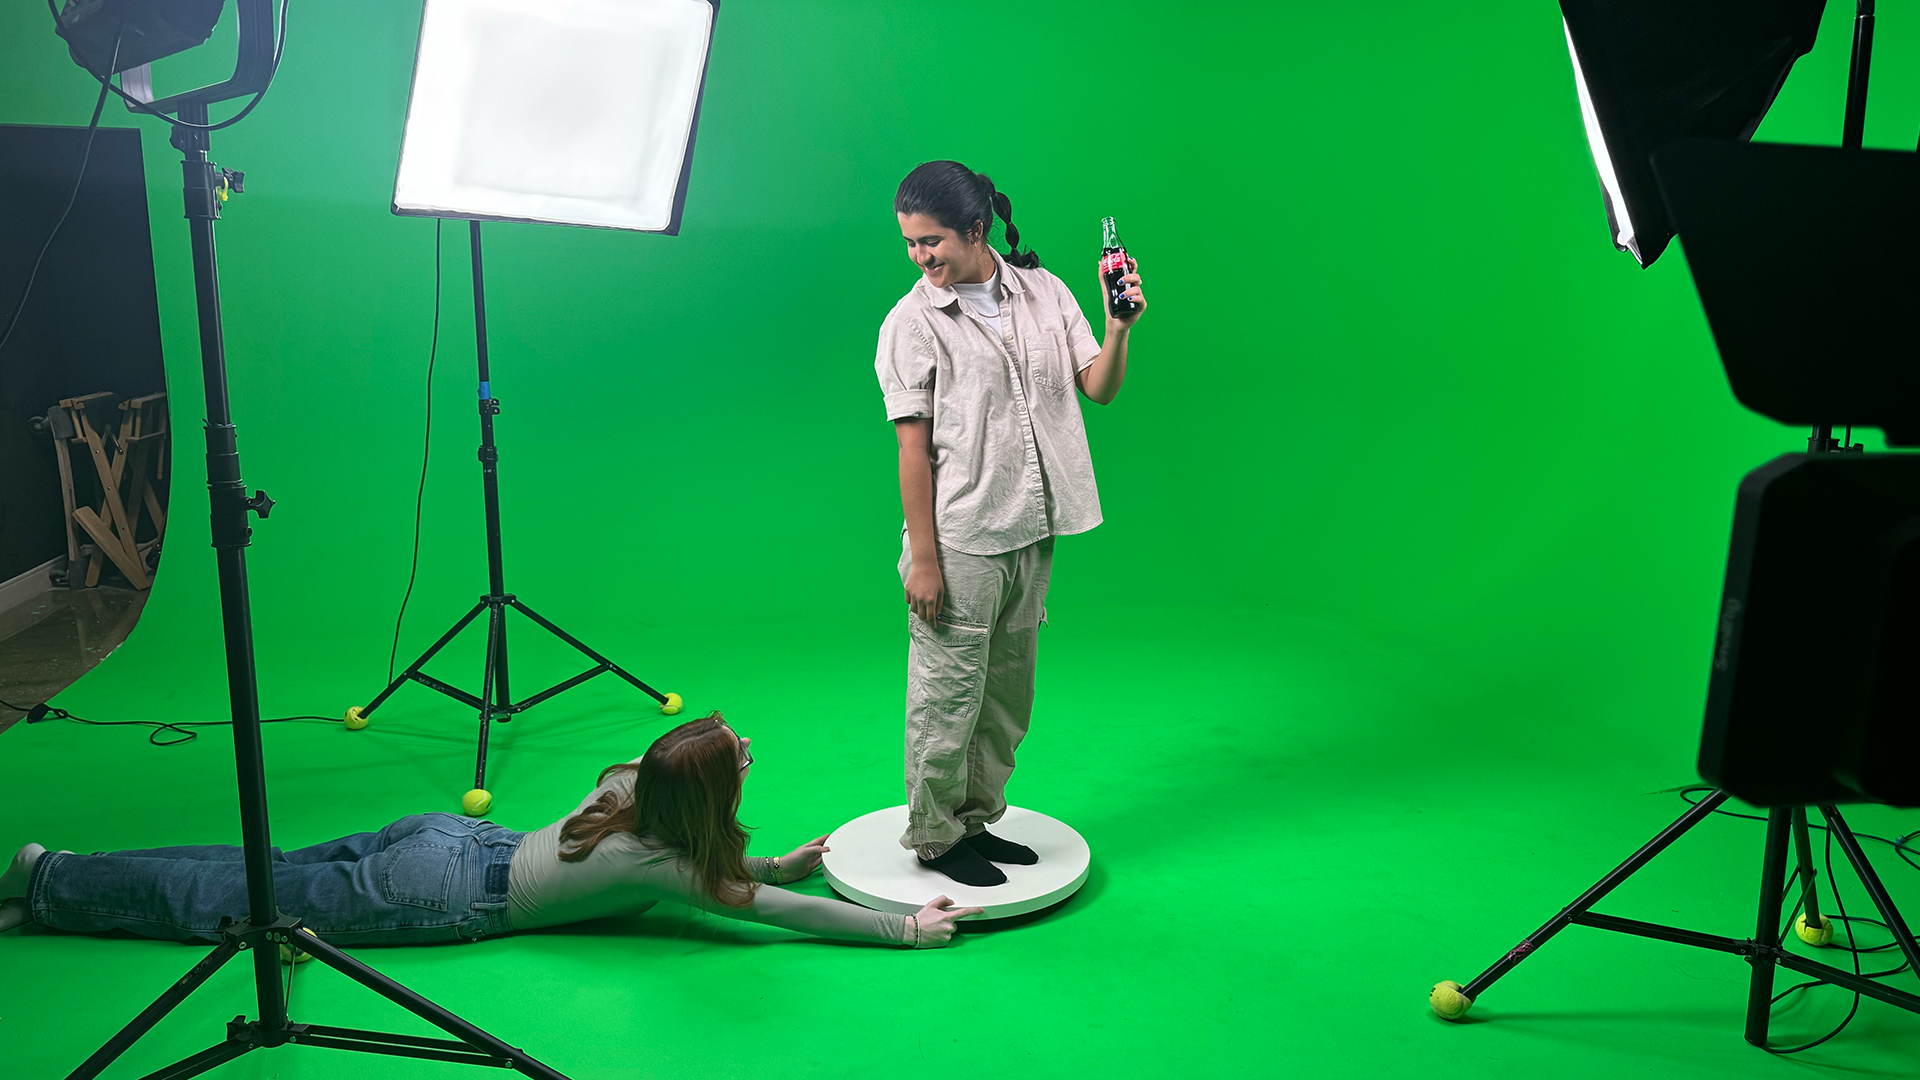
I used the IBK Gizmo and IBK Color Stack nodes provided by the school, along with Keylight and Premult nodes, to remove the green screen. I also applied Despill to eliminate any excess green light that bounced back onto the model.
Holograms
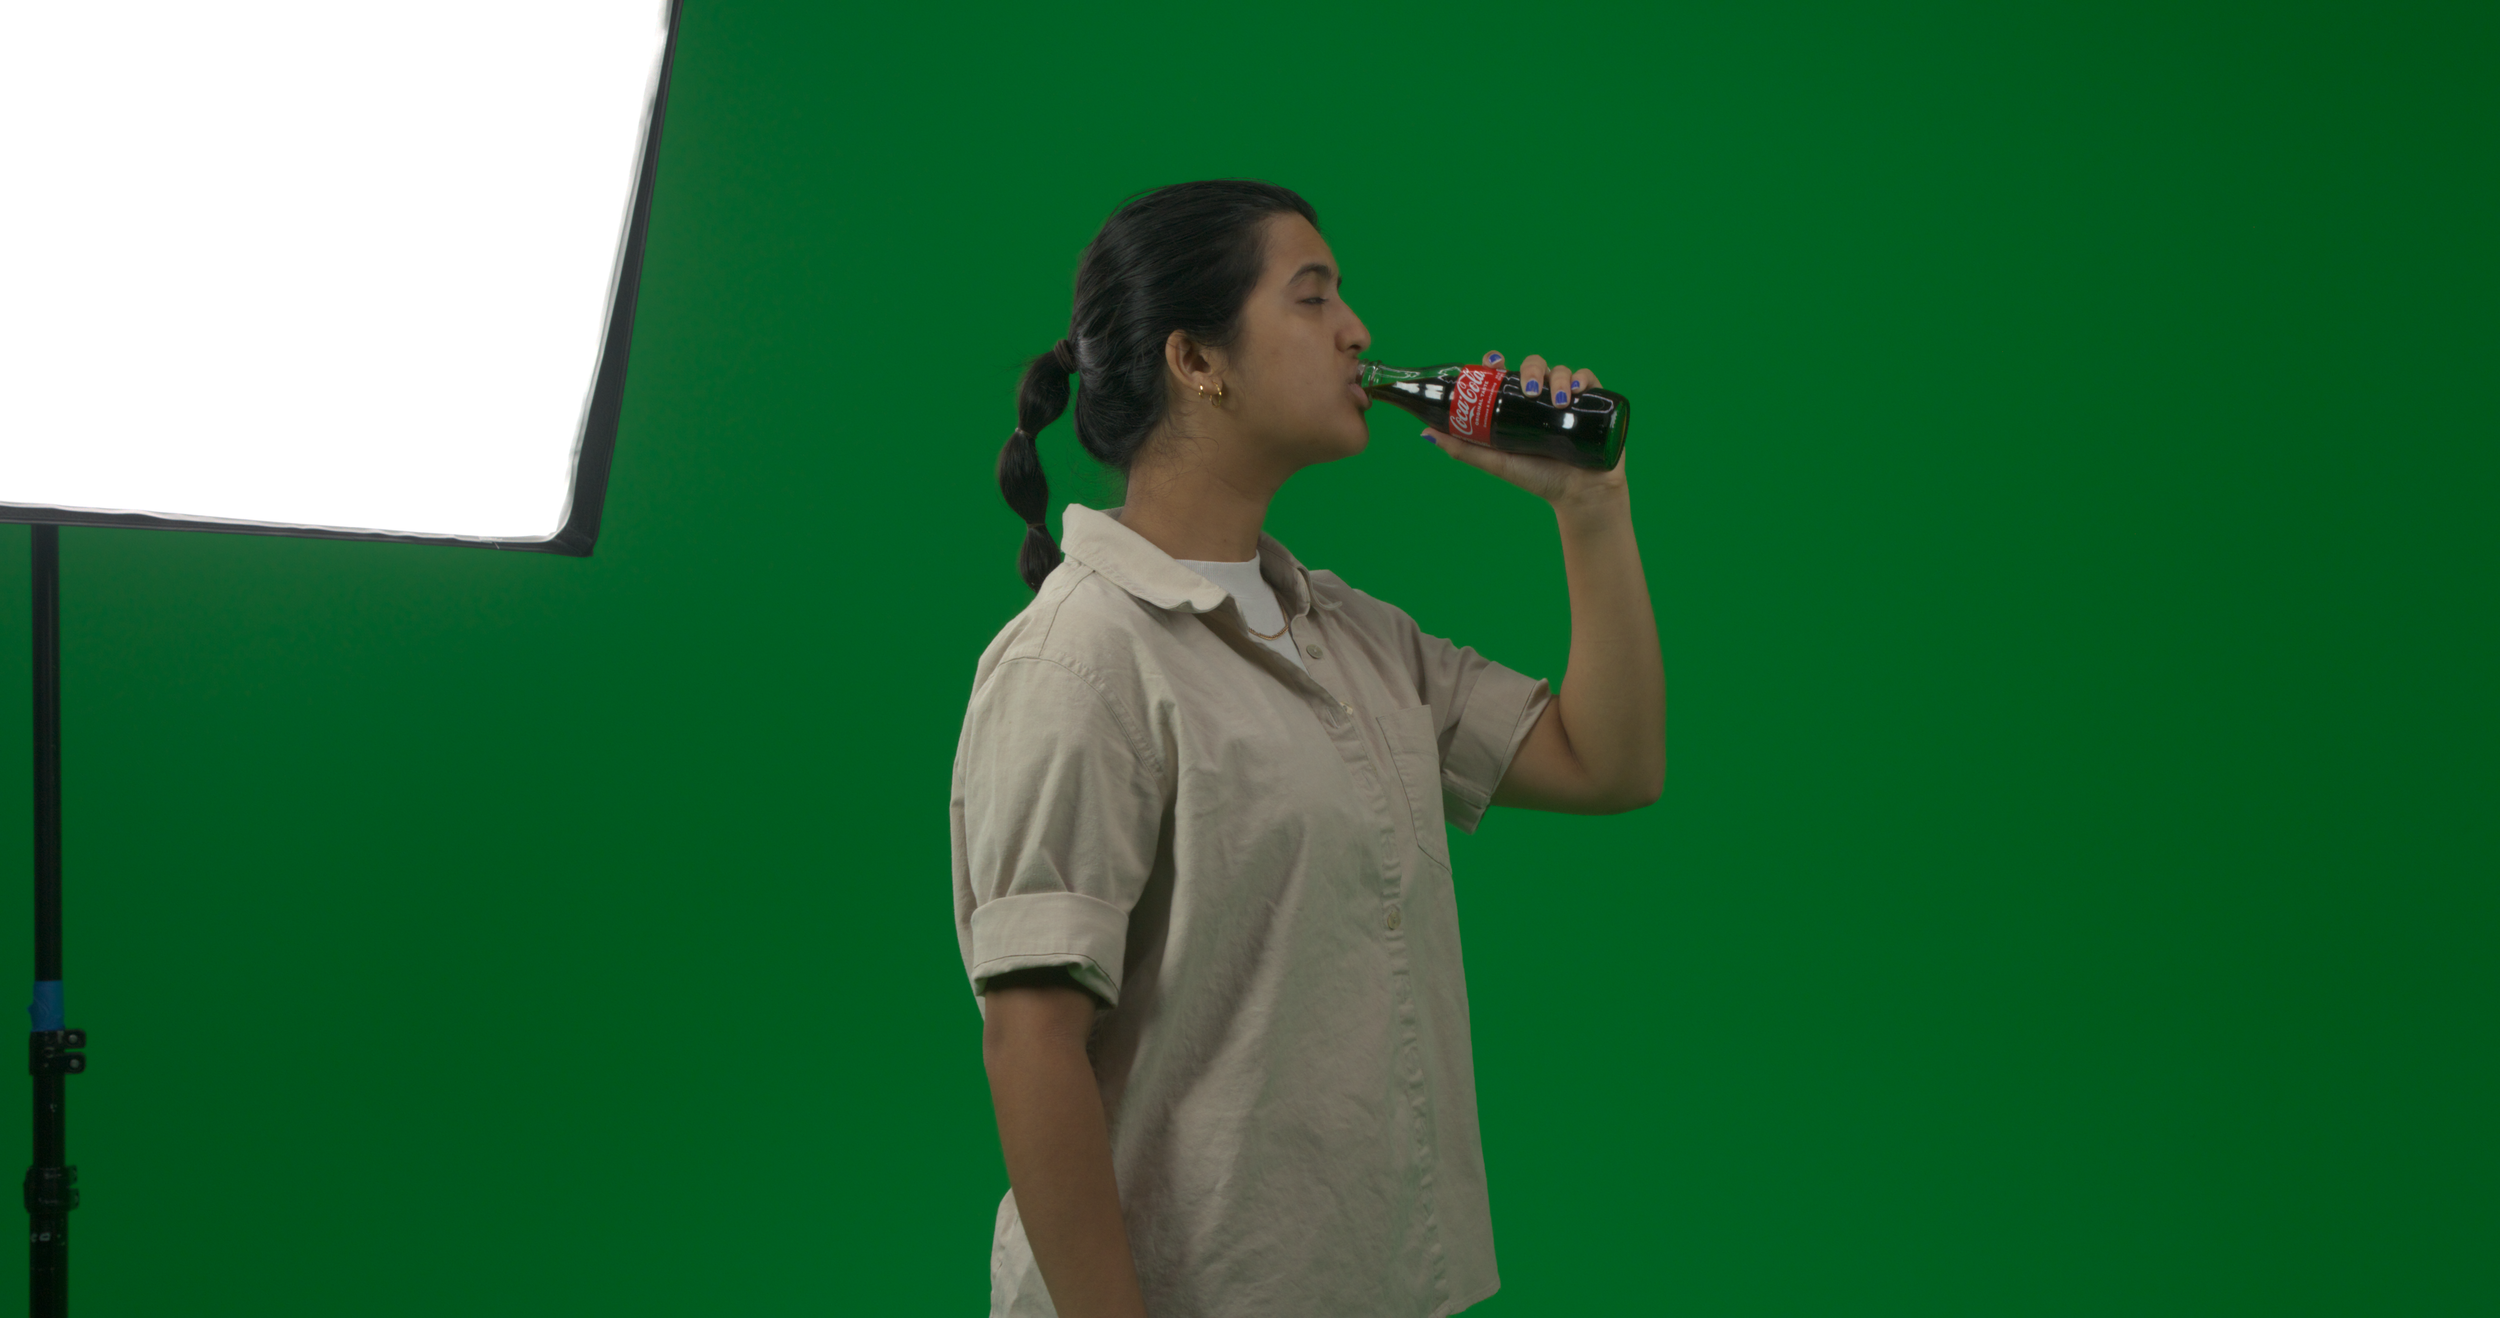
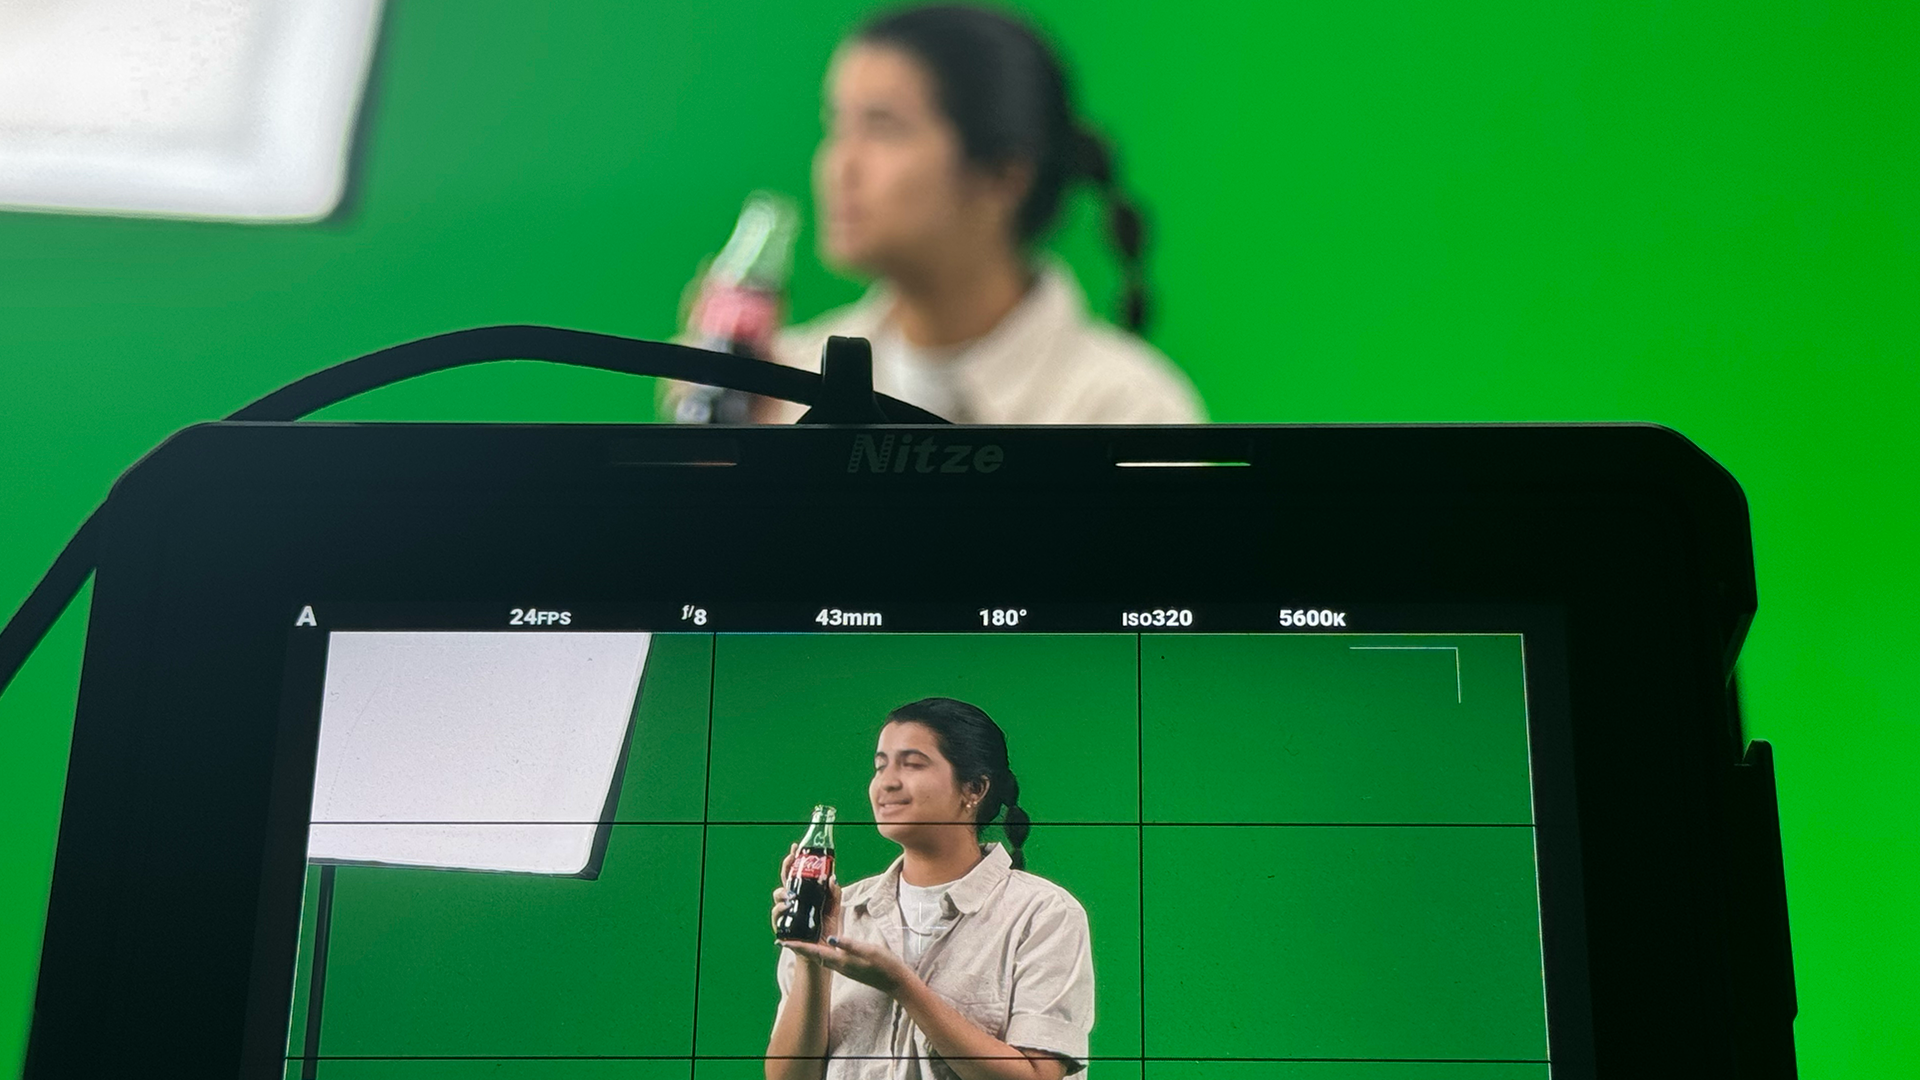
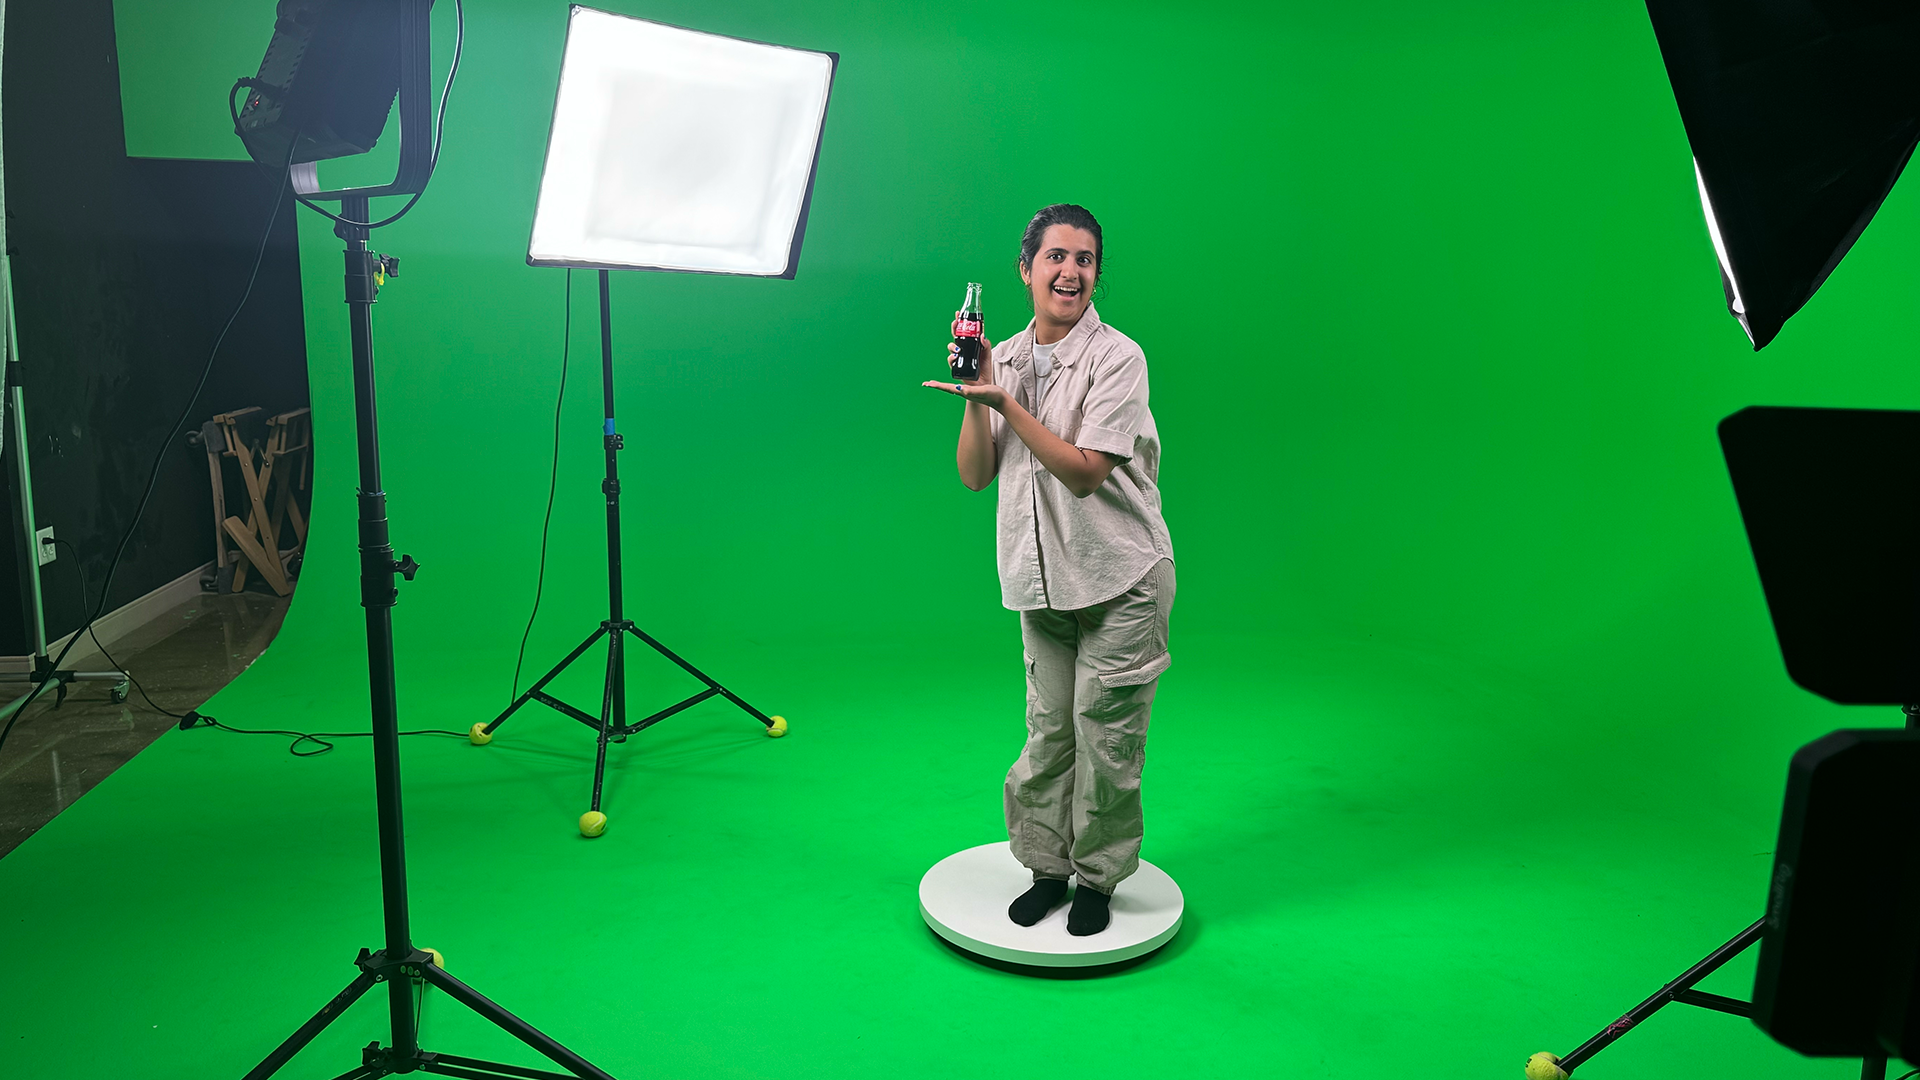
Keying Out
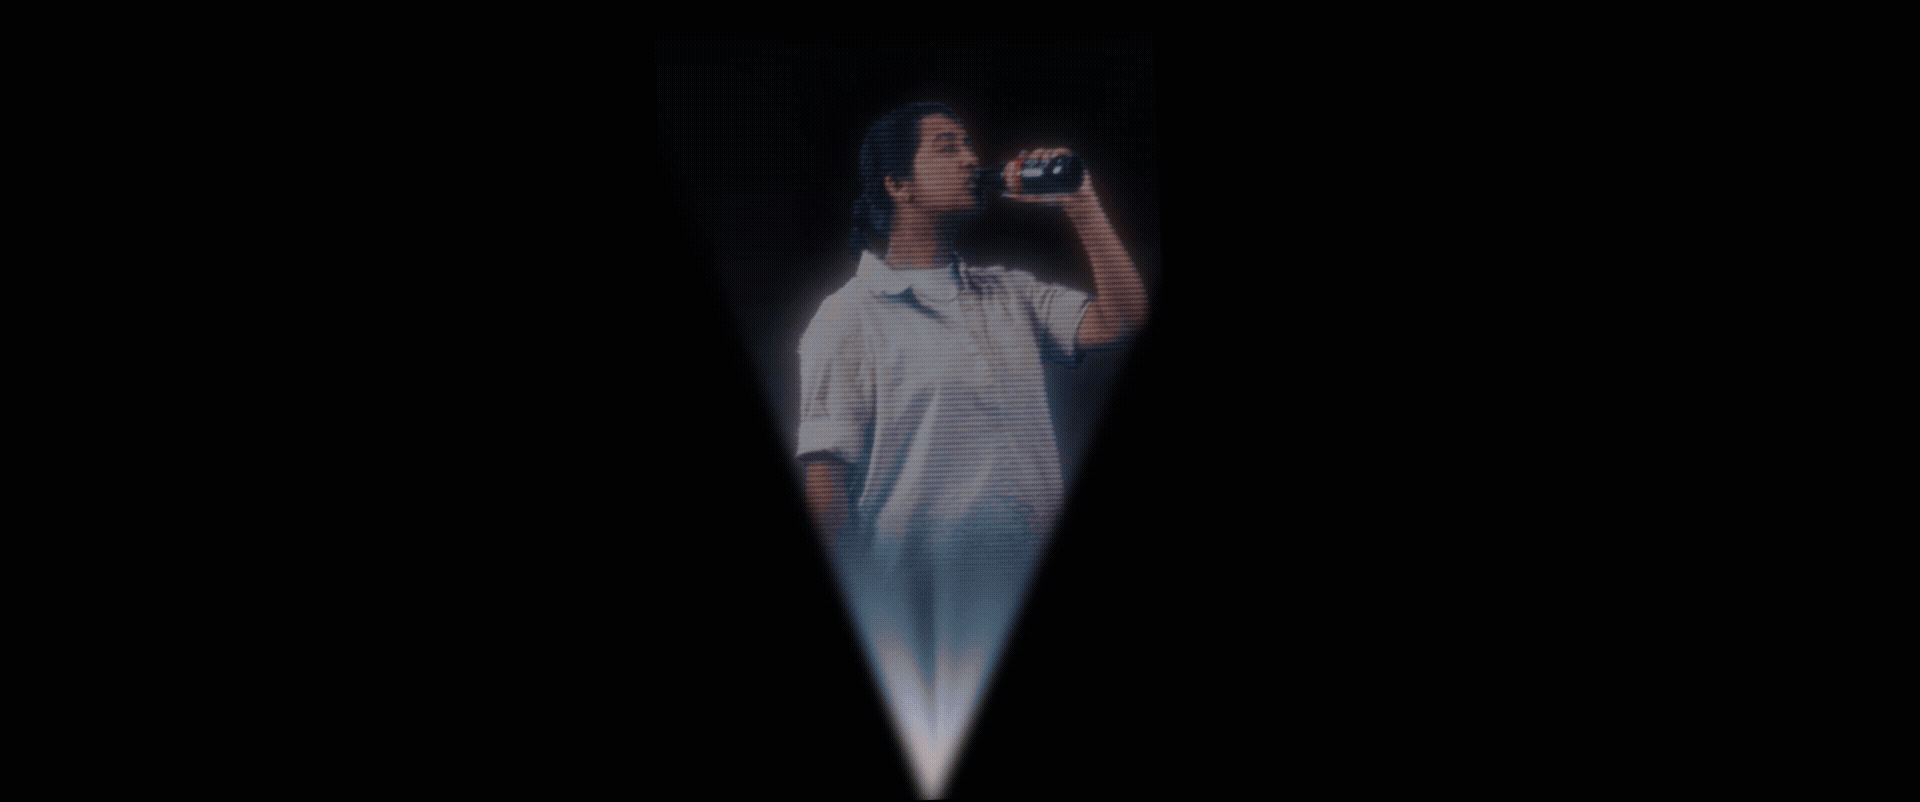
The first step in creating my hologram was filming my model in the green screen room so I could key her out cleanly. I placed her on a turntable and rotated her at a consistent, even pace. Including a person physically drinking a Coca-Cola, along with the model, reinforces the brand’s core value of customer satisfaction.
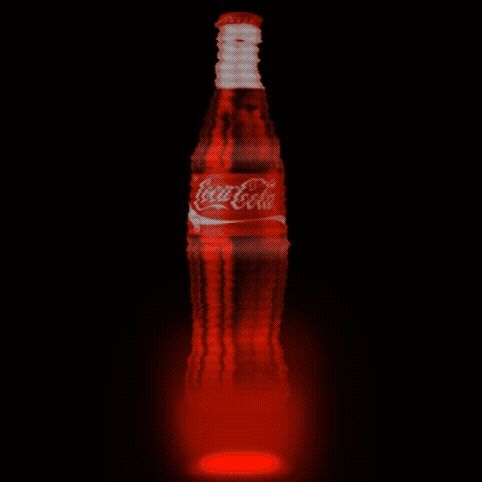
First Pass Hologram Motion Test
For my original motion test, I used a png of a Cola bottle due to not having the 3D model yet. The feedback that I received from my art director was to add in blue to the hologram and adjust the transparency so that the background could be partially seen. I also needed to alter the source light so it comes to a sharper point and include more light rays that moved with the figure and bottle.
Hologram Motion Tests
Final Composite Breakdown
Final Thoughts
Although this project was originally designed to help me become more familiar with Houdini, I decided to incorporate Nuke as well so I could challenge myself with additional visual-effects tasks. Throughout the process, I learned new methods of procedural thinking and gained a better understanding of which software is best suited for different problems, such as creating fog and depth-of-field effects. Overall, the project presented many technical challenges that pushed me to expand my skill set and learn new aspects of visual effects that I can carry into future work.
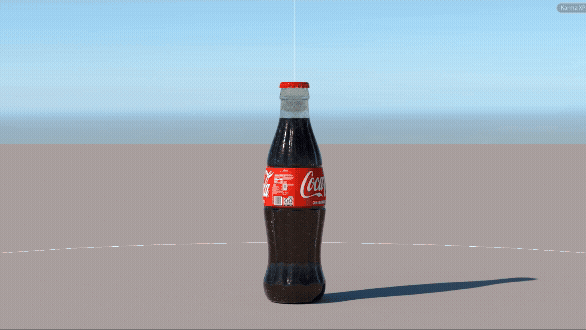
Turntable

Coca-Cola Bottle from cgtrader
This turntable in Houdini was set up to showcase the shaders applied to the bottle. The transition from the bottle rotating to the HDRI rotating was designed to demonstrate how the materials respond to different lighting scenarios.
The model on the right was downloaded from CGTrader, but I made several adjustments to the materials to better integrate it into my scene. These tweaks helped align the asset with the overall concept, lighting conditions, and visual direction I was aiming for.
Coca-Cola Bottle Turntable
This setup required creating a USD version of the bottle and adding it to the Layout Asset Gallery so I could easily implement it into the scene later. The image on the right shows the node tree, beginning with the Component Geometry node, which organizes the model into a USD-ready format.
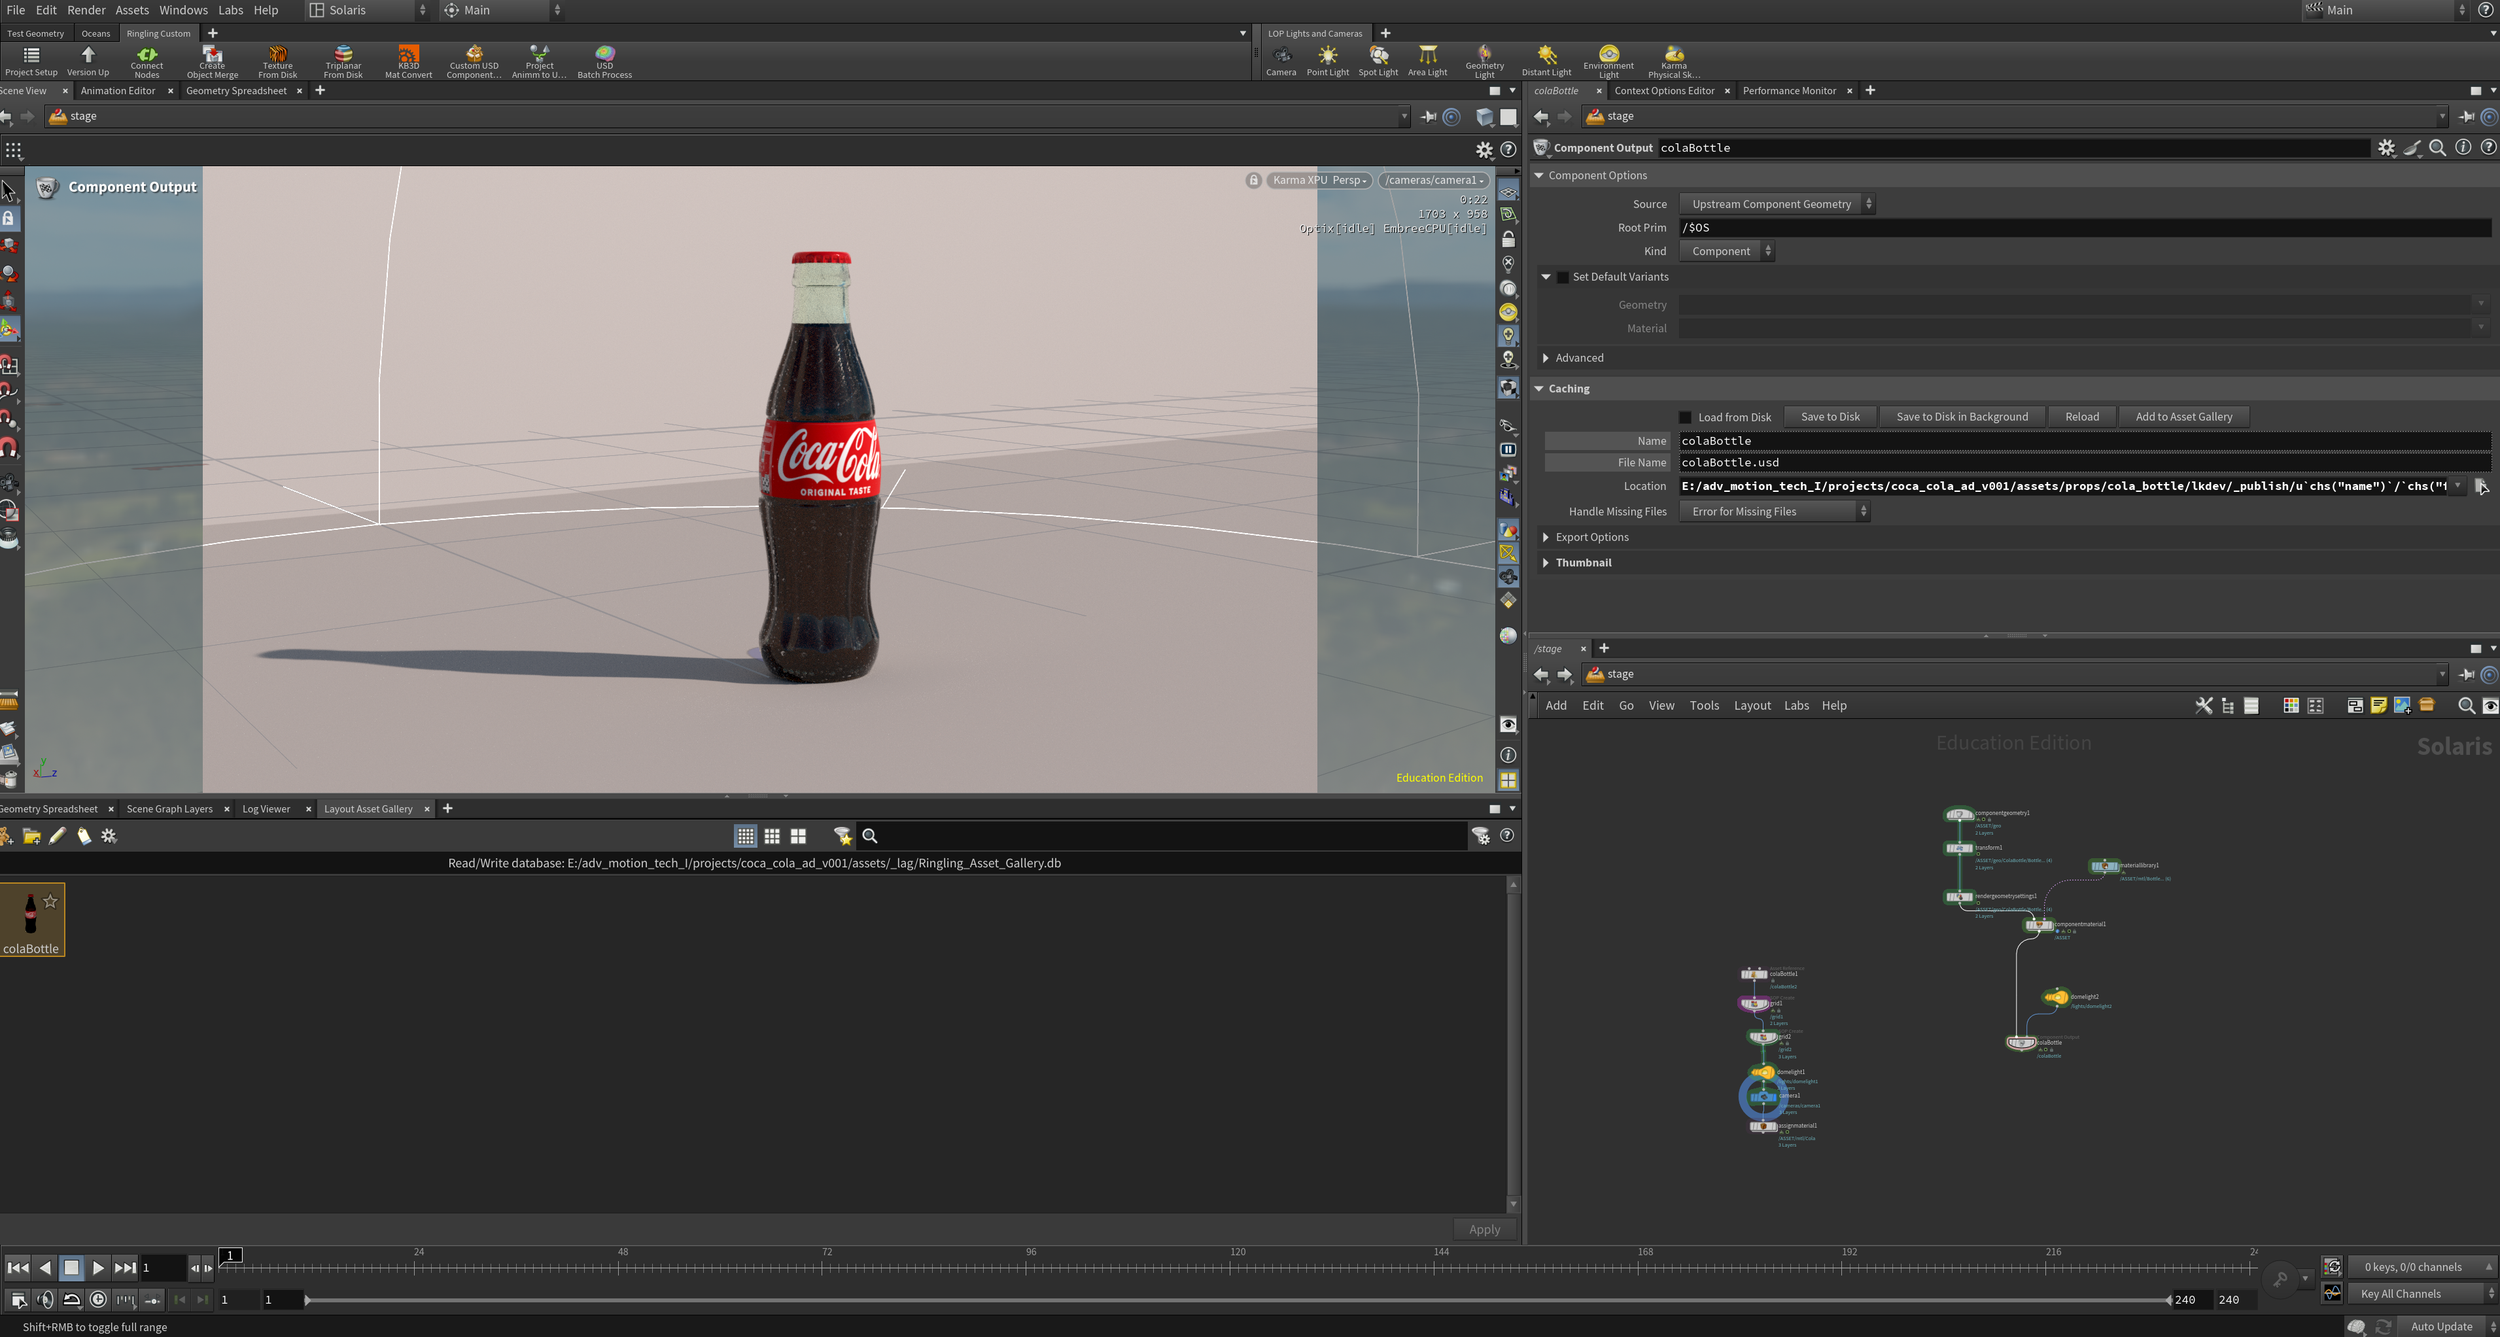
Turntable Houdini Set up
Layout Asset Processing
When preparing the KitBash 3D assets in Houdini, I needed test the quality of the materials with different lightings, similar to the Coca-Cola bottle. I used two spheres, one with a metallic shader and one with a diffused grey shader. The spheres show what the lighting looks like on a neutral material to compare what it looks like on the detailed textures on the model.
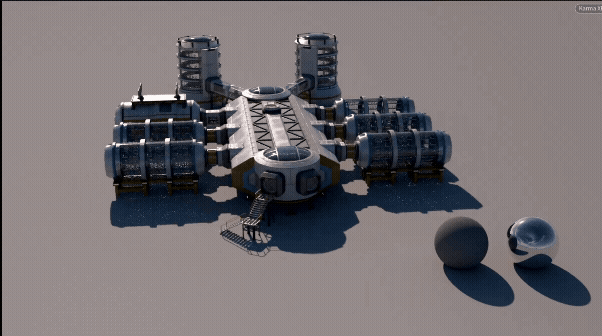
KitBash 3D Asset Turntable
Like the bottle, I created light variations of the assets so that I could chose what time of day my scene was set in without replacing my asset entirely. Through the component geometry node, I saved the asset to disk and created a new asset with the light variations. Once the asset was in the library, I dragged it into the scene above and went to the variant tab and added 1 variant. Under variant set, I selected light (lgt) to turn them on.
First Pass Style Frame

Light Variants for KitBash 3D Assets
Final Pass Style Frame
Final Pass Style Frame
Th original layout didn’t offer depth and having the hologram in the center didn’t create an interesting visual. My art director gave me a note to fill the space with more buildings and use a right of third composition. I also wanted to add more depth by placing buildings in the background behind the hologram, as well.

Final Pass Hologram Motion Test
Using the Keyed out footage of my model and a render of the rotating Cola bottle, I made a revised motion test of the hologram where I adjusted the transparency, blue tint, and base light so it resembled my reference.